I'm the administrator 's GadgeTwo !ヽ(´ー`)ノ
This time I got a question from a foreign country.
So I will explain the method of SIM Unlock and DoCoMoization in English.
We will show you how to SIM Unlock and DoCoMoization at SCV33 / SCV35 / SCV36 / SCV37.
※Because the page has become plural, I integrated page.
・Corresponding terminal.
Galaxy S7 Edge SCV33 -> SC-02H
Galaxy S8 SCV35 -> SC-03J
Galaxy S8+ SCV36 -> SC-02J
Galaxy Note8 SCV37 -> SC-01K
Let's explain how to the SIM Unlock and DoCoMoization of the SCV3x.
Originally au does not accept SIM unlock unless it is 101 days after purchase date.
However, by doing this method, you can immediately release SIM lock.
In addition, Docomo's FOMA Plus Area (B6) and LTE Band (B19) will be available.
It is the best choice to use with MVNO carrier of Japanese career.
This can also be used outside of Japan !(*´∀`*)b"
Table of contents
1. What you need
2. Samsung driver Installation
3. Prepare ROM burning with Odin3
4. Operate the terminal
5. Burn DoCoMo ROM
6. How to start Recovery Mode
7. Initialize terminal from Recovery Mode
8. When returning to au Genuine ROM
9. Corresponding band of SCV series (DoCoMoization)
What you need
1a. Download drivers and etc tools.
・PC
→ Windows XP or later (We recommend 7 or 10)
・Smart Switch PC
→ Click on the Windows version in the middle of HP (Download destination)
・Odin3 (latest version)
→ Odin3 Ver12.3 (Download destination)
・Samsung Android USB Driver
→ SAMSUNG USB DRIVERS 1.5.27.0 (Download destination)
※When installing Smart Switch PC, installation of USB Driver is unnecessary.
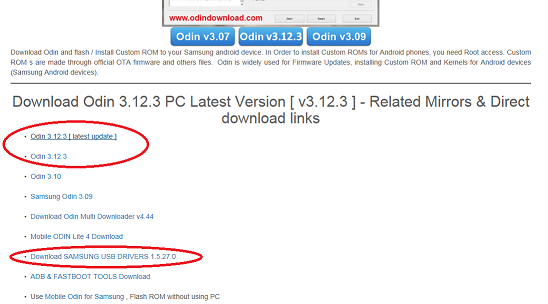
1b. Download ROM: It is possible to acquire the old ROM although the speed is slow.
Download the file according to the corresponding phone.
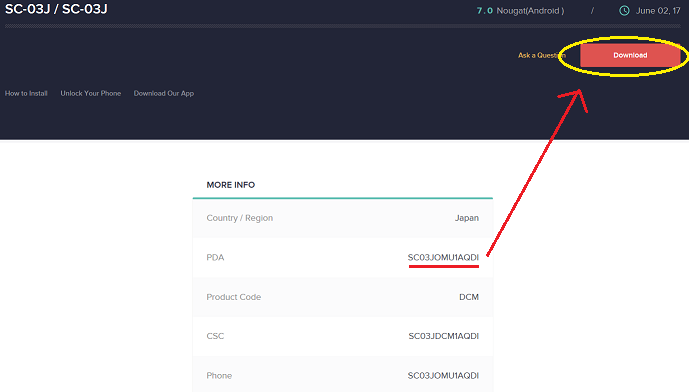
Click the ROM version to download and click the red "Download" button at the top right of the page.
The version of Old ROM may be better.
When downloading from the site, it takes a very long time because the speed is only about 50 Kb/s.
●In the case of Galaxy S7 Edge
・SC-02H Genuine ROM(SIM Unlock and DoCoMoization)
→ SC02HOMU1APD6 etc. (Download destination)
・SCV33 Genuine ROM(When to return to genuine)
→ SCV33KDU1APD6 etc. (Download destination)
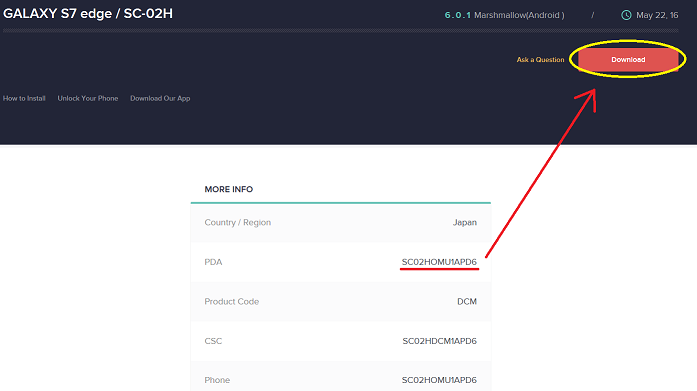
●In the case of Galaxy S8
・SC-02J Genuine ROM(SIM Unlock and DoCoMoization)
→ SC02JOMU1AQDI etc. (Download destination)
・SCV36 Genuine ROM(When to return to genuine)
→ SCV36KDU1AQEH etc. (Download destination)
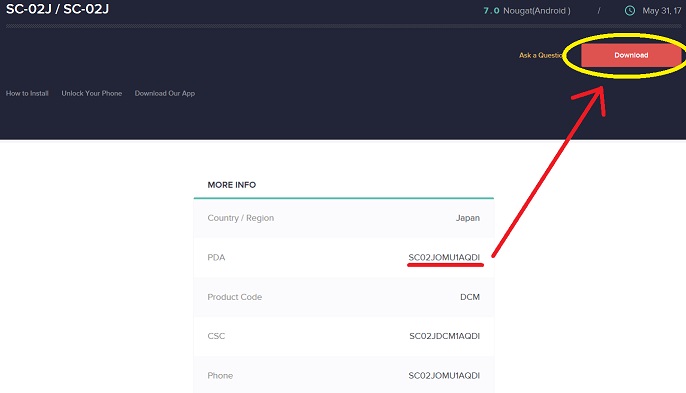
●In the case of Galaxy S8+
・SC-03J Genuine ROM(SIM Unlock and DoCoMoization)
→ SC03JOMU1AQDI etc. (Download destination)
・SCV35 Genuine ROM(When to return to genuine)
→ SCV35KDU1AQEH etc. (Download destination)
●In the case of Galaxy Note8
・SC-01K Genuine ROM(SIM Unlock and DoCoMoization)
→ SC01KOMU1AQI8 etc. (Download destination)
・SCV37 Genuine ROM(When to return to genuine)
→ SCV37KDU1AQI8 etc. (Download destination)
※As of Nov 10, 2017, this has not been listed yet→See 1c.
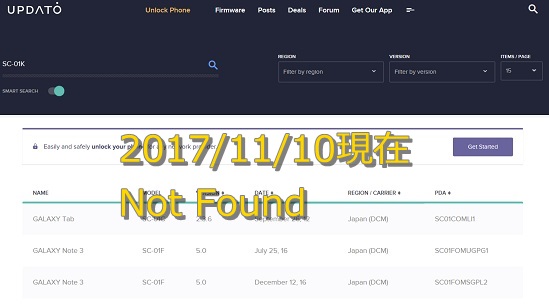
1c. ROM download: Get the latest ROM at the fastest speed
This method is to acquire the firmware with the download tool.
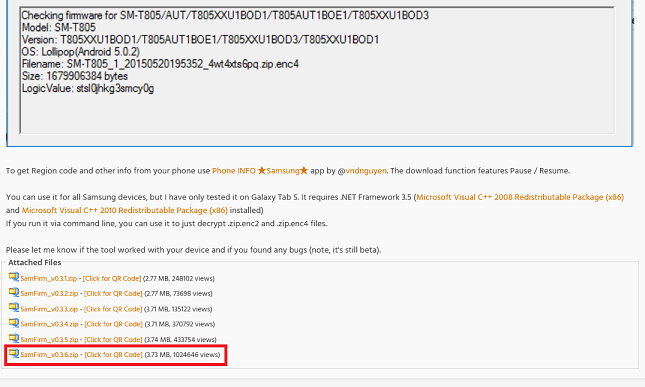
Please download the latest version of SamFirm which has been uploaded to XDA.
・SamFirm Ver 0.3.6: (Download destination)
1d. Start SamFirm
Download "SamFirm_v0.3.6.zip" and unpack it to the appropriate place.
After decompressing, click "SamFirm.exe" in the folder to start the tool.
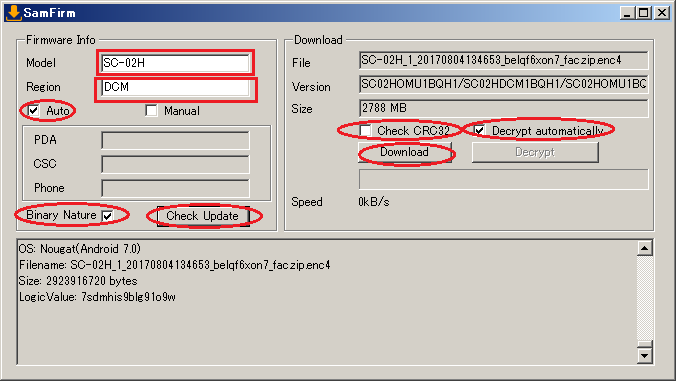
1e. After starting SamFirm, set it as follows.。
◆Setting method
・Model: Model number of the Phone.(eg: SC-02J、SC-03J、SCV35、SCV36 etc)
・Region: "DCM" for docomo, "KDI" for au, "SBM" for SoftBank.
・Auto: Checked
・Binary Nature: Unchecked
・Check CRC32: Unchecked (Invalid CRC check after download)
・Decrypt automatically: Checked(Automatically unencrypt the file after downloading)
●In the case of Galaxy S7 Edge (SCV33)
・Model: SC-02H
・Region: DCM
・Auto: Checked
・Binary Nature: Unchecked
・Check CRC32: Unchecked (Invalid CRC check after download)
・Decrypt automatically: Checked(Automatically unencrypt the file after downloading)
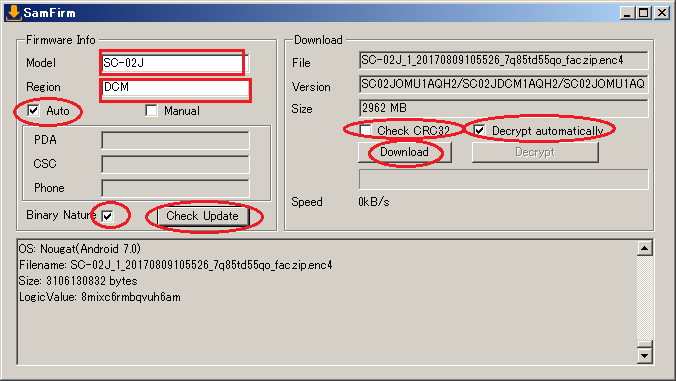
●In the case of Galaxy S8 (SCV36)
・Model: SC-02J
・Region: DCM
・Auto: Checked
・Binary Nature: Unchecked
・Check CRC32: Unchecked (Invalid CRC check after download)
・Decrypt automatically: Checked(Automatically unencrypt the file after downloading)
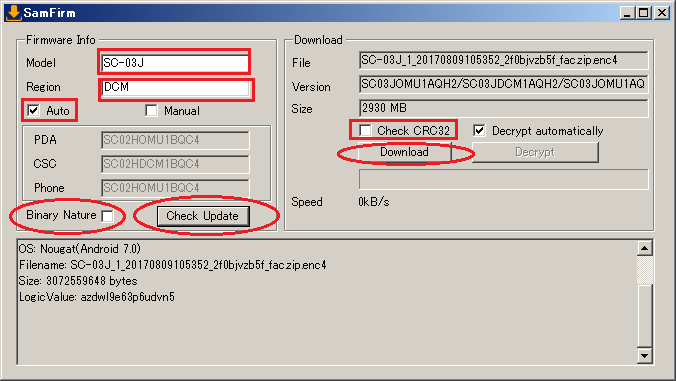
●In the case of Galaxy S8+ (SCV35)
・Model: SC-03J
・Region: DCM
・Auto: Checked
・Binary Nature: Unchecked
・Check CRC32: Unchecked (Invalid CRC check after download)
・Decrypt automatically: Checked(Automatically unencrypt the file after downloading)
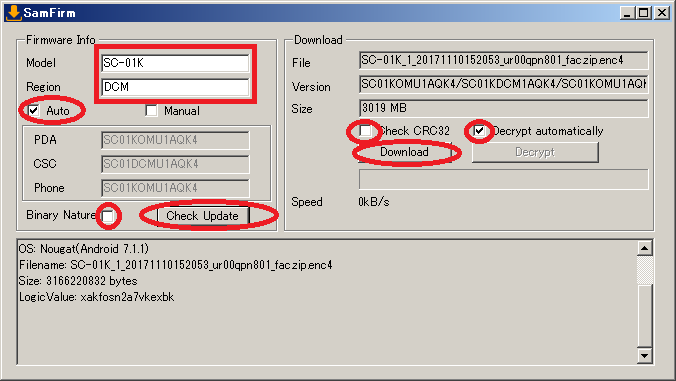
●In the case of Galaxy Note8 (SCV37)
・Model: SC-01K
・Region: DCM
・Auto: Checked
・Binary Nature: Unchecked
・Check CRC32: Unchecked (Invalid CRC check after download)
・Decrypt automatically: Checked(Automatically unencrypt the file after downloading)
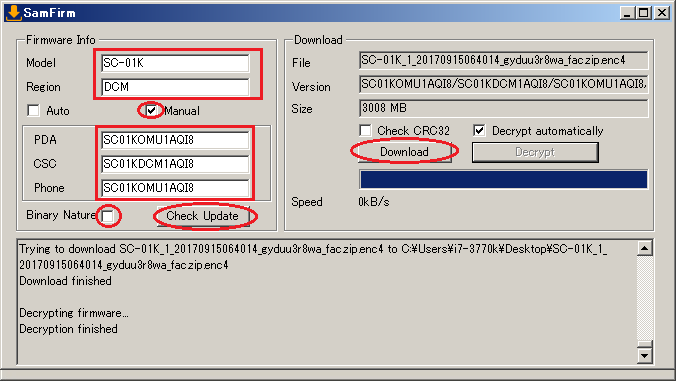
●Old Method
In addition to the above settings, this time set for SC-01K in manual mode.
※This is the current setting for 2017/11/10. It is necessary to change the setting when a new FW comes out.
・Model:SC-01K
・Region: DCM
・Manual: Checked
・PDA: SC01KOMU1AQI8
・CSC: SC01KDCM1AQI8
・Phone: SC01KOMU1AQI8
・Binary Nature: Unchecked
1f. In addition, The setting of SCV3x is as follows.。
●In the case of Galaxy S7 Edge (SCV33)
・Model: SCV33
・Region: DCM
・Auto: Checked
・Binary Nature: Unchecked
・Check CRC32: Unchecked (Invalid CRC check after download)
・Decrypt automatically: Checked(Automatically unencrypt the file after downloading)
●In the case of Galaxy S8 (SCV36)
・Model: SCV36
・Region: DCM
・Auto: Checked
・Binary Nature: Unchecked
・Check CRC32: Unchecked (Invalid CRC check after download)
・Decrypt automatically: Checked(Automatically unencrypt the file after downloading)
●In the case of Galaxy S8+ (SCV35)
・Model: SCV35
・Region: DCM
・Auto: Checked
・Binary Nature: Unchecked
・Check CRC32: Unchecked (Invalid CRC check after download)
・Decrypt automatically: Checked(Automatically unencrypt the file after downloading)
●In the case of Galaxy Note8 (SCV37)
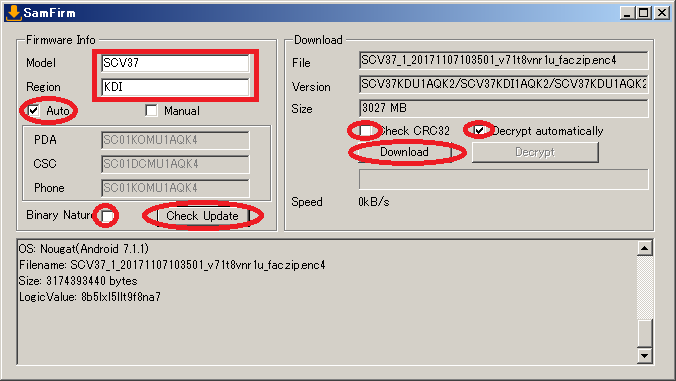
・Model: SCV37
・Region: KDI
・Auto: Checked
・Binary Nature: Unchecked
・Check CRC32: Unchecked (Invalid CRC check after download)
・Decrypt automatically: Checked(Automatically unencrypt the file after downloading)
●Old Method
※This is the current setting for 2017/11/10. It is necessary to change the setting when a new FW comes out.
※Updates began on November 14, 2017. Please leave "Auto" and press "Check Update".
Manual mode
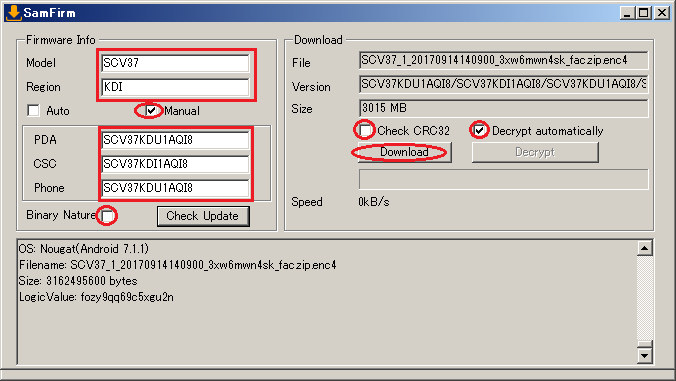
・Model: SCV37
・Region: KDI
・Manual: Checked
・PDA: SCV37KDU1AQI8
・CSC: SCV37KDI1AQI8
・Phone: SCV37KDU1AQI8
・Binary Nature: Unchecked
1g. Downloading the latest farm.
After making the settings in the previous section, you will check the latest farm by pressing "Check Update".
After finding the farm you can download it anywhere on My Computer just by pressing "Download".
During the download, the progress of the Speed bar will advance, so you can understand it at a glance.
Since the speed is downloaded from Samsung server, it can download at a speed as fast as 4MB/s.
1h. Extract ROM
Please unzip the file when ROM download is completed.
The following four files are necessary for SIM Unlock and DoCoMoization.
・AP_SC0x~
・BL_SC0x~
・CP_SC0x~
・CSC_SC0x~
・SC-02H

・SC-02J

・SC-03J

・SC-01K

Samsung driver Installation.
Please install Smart Switch PC (Smart_Switch_PC_setup.exe) downloaded in 1-1.
If you do not need Samsung application please unzip and install Samsung Android USB Driver (USB_Drivers_1.5.27.0.rar).
※Installing the driver takes some time.
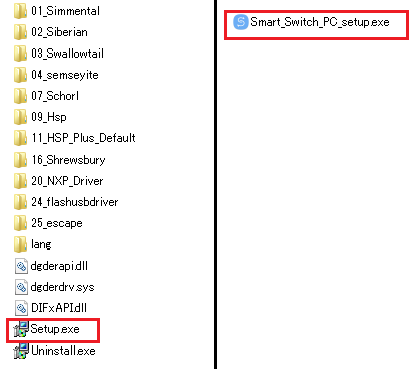
By the way, with Smart Switch PC,
It is integrated software for Galaxy, it is software which can perform data backup, recovery, update, migration from other models and so on.
This includes the latest drivers for Galaxy.
In other words it is iTune of Galaxy version.
Prepare ROM burning with Odin3
Next, burn the docomo ROM on the terminal, then SIM Unlock and DoCoMoization.
If you do not make a mistake in the procedure, please do not worry because it will not break.
※Let's charge the phone before ROM burning.
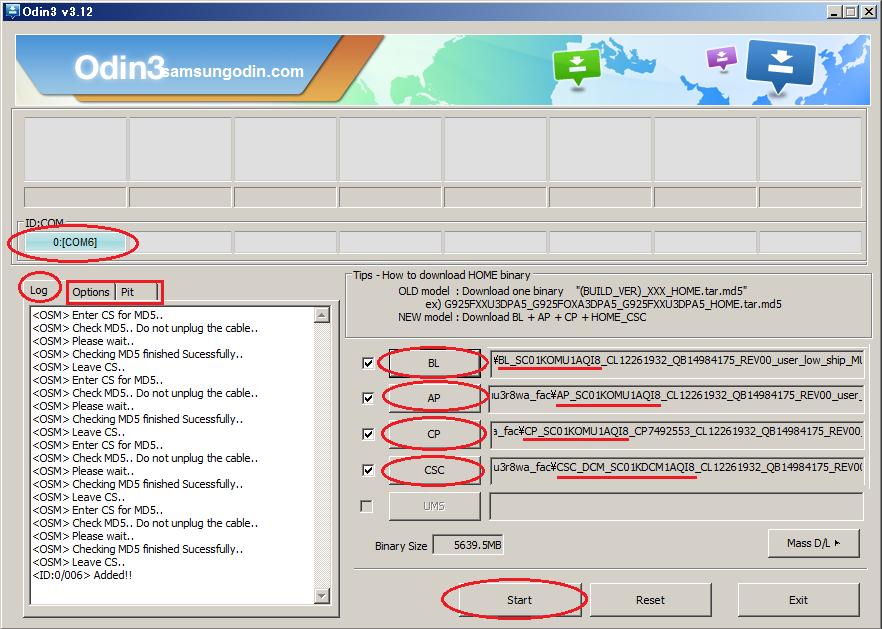
After starting Odin 3, specify ROM to be burned.
Before specifying the ROM, connect the PC and the Phone and check if the Samsung driver is correctly installed.
When the terminal is connected to the personal computer with the power on, the connection status is OK if a light blue COM number is displayed at "ID: COM" on the upper left of Odin3.
The specification method of ROM is as follows.(Not press Start)。
BL Button → Those whose file name starts with "BL_xxx"
AP Button → Those whose file name starts with "AP_xxx"
CP Button → Those whose file name starts with "CP_xxx"
CSC Button → Those whose file name starts with "CSC_xxx"
※Attention!:Options and Pit items are for people who understand the contents.
Please do not touch Options and pit if you do not understand the meaning of the setting item.
Operate the terminal
Enter Download Mode to write the ROM to the terminal.
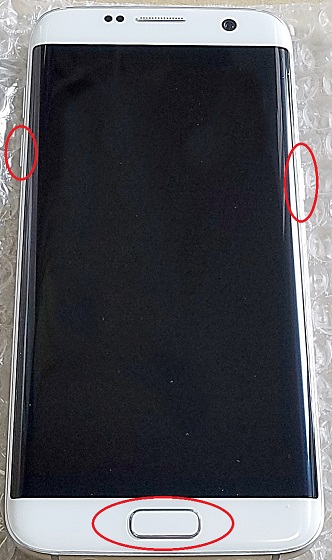
・Galaxy S7 Edge
Turn off the terminal and press and hold down the [Power] button on the right while holding down the [Volume Down] + [Home] button.
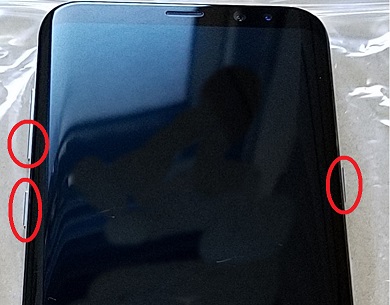
・Galaxy S8/S8+/Note8
Turn off the terminal and press and hold down the [Power] button on the right while holding down the [Volume Down] + [Bixby] button on the left side.
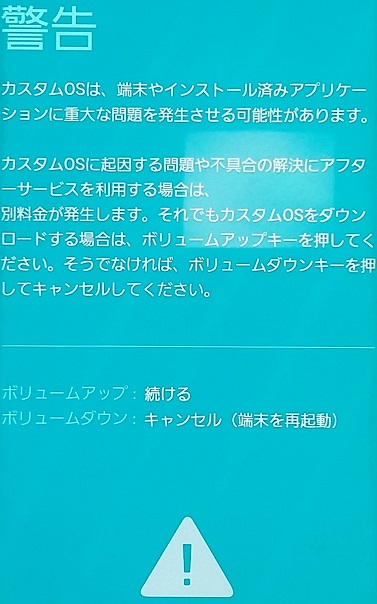
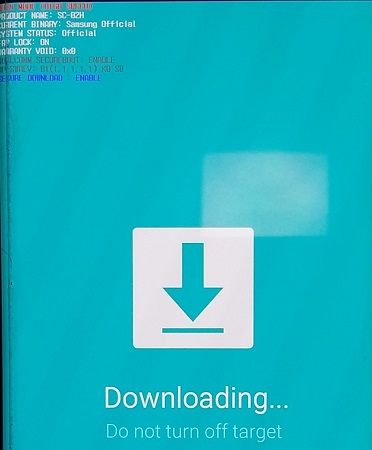
Since the selection screen of DawnloadMode is displayed, press the [Volume Up button].
To stop ROM burning, press the [Volume Down] button to reboot.
※I did not take pictures of this part. Will use the photo of SC-02H instead.
Burn DoCoMo ROM
When [Downloading ...] is displayed on the phone screen, connect the PC and the terminal with USB.
If you press the [Start] button of Odin3 prepared in 「3. Odin 3 ROM burn preparation」 in the previous section, ROM burning start.
Wait a few minutes as the progress bar appears on Odin3 screen.

How to start Recovery Mode
When the ROM burning is completed it will be restarted and "system update" will be displayed,
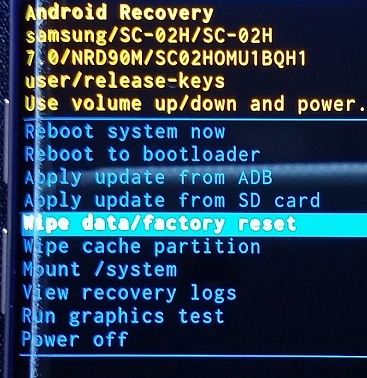
When the display disappears, enter RecoveryMode by pressing and holding the volume [UP] + [Bixby] + [Power] button on the main unit at the moment of disappearance.
If you miss the timing, you can press the [Volume Down] + [Power] button for a long time to force reset.
Press and hold [Volume UP] + [Bixby] + [Power] button at the moment of resetting and put it into RecoveryMode.
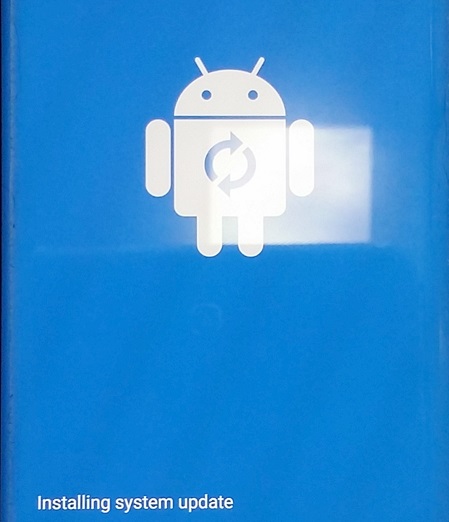
If you do not enter RecoveryMode and start up the system as it is,
A warning is issued due to ownership or signature of data and it can not be started.
I think I was urged to initialize.
Initialize terminal from Recovery Mode
After entering RecoveryMode, select "Wipe Date" and initialize the terminal.
After initialization is completed, if you perform Reboot, SIM Unlock and DoCoMoization are completed.
※Wipe Data/factory reset → Yes → Reboot system now
When returning to au Genuine ROM
Return to the 3. Prepare ROM burning with Odin3 in the previous section.
By specifying the downloaded au genuine ROM in the same way and burning the ROM, you can return to the au genuine state.
・SCV33

・SCV35

・SCV36

・SCV37

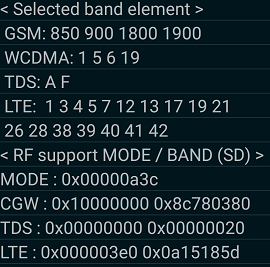
Corresponding band of SCV series (DoCoMoization)
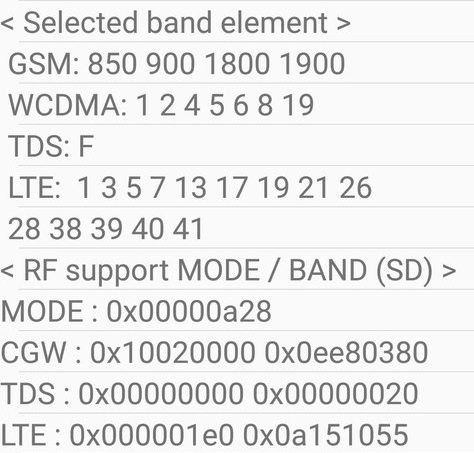
After doing SIM Unlock and DoCoMoization in this work,
I confirmed that I grabbed the radio waves of FOMA Plus area and docomo LTE band.
●Galaxy S7 Edge -> SC-02H
●Galaxy S8 -> SC-02J
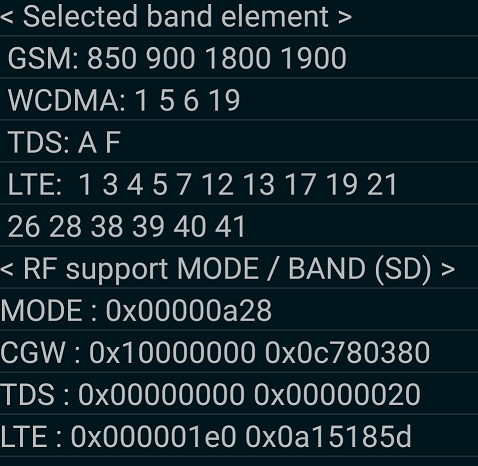
●Galaxy S8+/Note8 -> SC-03J/SC-01K
◆Attention point of NFC/Felica.
If NFC/Felica is used with au genuine ROM, it will not be usable in a docomo state.
In that case you can use NFC/Felica if you return to au genuine ROM.
This is presumed to be because carrier information etc. are written in NFC/Felica chip when NFC/Felica is first initialized.
This is the end of work♪
If you can check the operation, I'm happy if you can post comments on this blog.(*´ω`*)
Back to Contents


0 件のコメント:
※不適切コメントについて:誹謗中傷宣伝等は事前通知無く削除致しますのでご遠慮下さい。
※Twitter風絵文字入力対応:🤣🤔😳💖📲🔰
コメントを投稿